Every time you want to try a new operating system, you wipe your pendrive, flash a new ISO, and lose the previous one. Ventoy fixes that. You install it once on a USB drive, then simply copy ISO files onto the drive — as many as fit — and pick which one to boot from a menu.
What is Ventoy?
Ventoy is a free, open source tool that turns a USB drive into a multiboot drive. Instead of writing one ISO onto the drive and destroying everything else on it, Ventoy installs a small bootloader once. After that, the ISO files are just ordinary files sitting on the drive.
- No reflashing — adding or removing an OS is a plain file copy.
- Boots almost anything — over 1,000 tested ISOs: Linux distros, Windows installers, rescue and antivirus tools.
- Works on old and new PCs — both Legacy BIOS and UEFI.
- The drive stays usable — you can keep normal files on it alongside the ISOs.
- Windows and Linux versions — same drive works on both.
What you need
- A USB pendrive. 32 GB or larger is comfortable, since a single Linux ISO can be 3–5 GB.
- The ISO files you want to boot. In this guide I am using CachyOS and Pop!_OS.
- A PC running Windows or Linux to do the one-time install.
Warning: installing Ventoy erases everything on the pendrive. Back up anything important first.
Step 1: Install Ventoy on the pendrive (Windows)
- Go to ventoy.net and download the Windows
.zippackage — for exampleventoy-1.x.xx-windows.zip. - Unzip it and run Ventoy2Disk.exe.
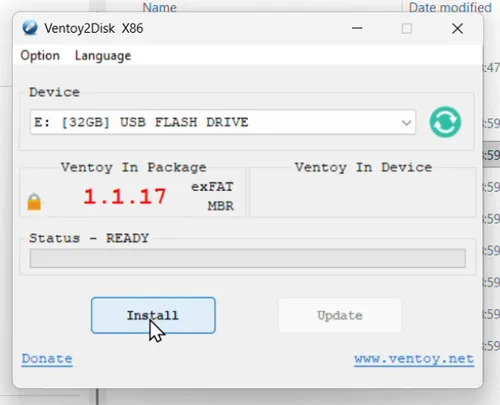
- Plug in your pendrive, then click the refresh button next to the Device box and select the drive. Check the drive letter and size carefully — picking the wrong device wipes the wrong disk.
- Click Install and confirm the two warnings.
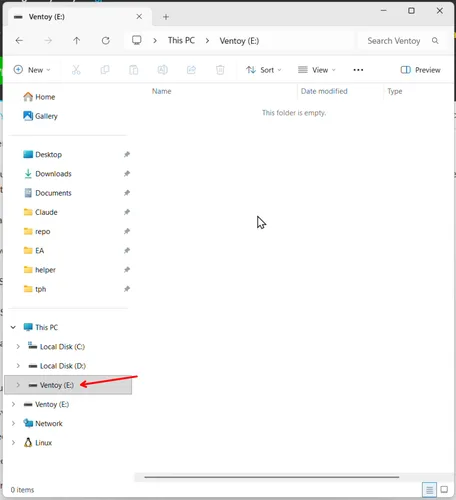
- When it finishes, a drive named Ventoy appears in This PC.
Installing on Linux
Download the .tar.gz package from the same page, extract it, and run the graphical installer:
tar xf ventoy-1.x.xx-linux.tar.gz
cd ventoy-1.x.xx
sudo ./VentoyGUI.x86_64
Or use the command line, replacing /dev/sdX with your pendrive (check it with lsblk first):
sudo sh Ventoy2Disk.sh -i /dev/sdXStep 2: Copy your ISO files
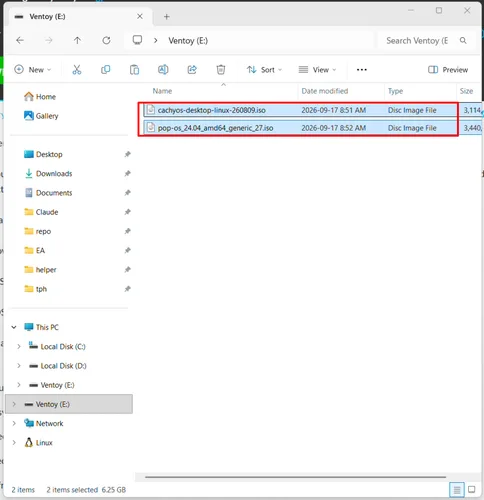
This is the part that feels too easy. Open the Ventoy drive and copy your ISO files onto it, exactly like copying photos. No special tool, no flashing, no waiting for an image to be written sector by sector.
You can organise the ISOs into folders if you like — Ventoy scans subfolders too. Keep file names descriptive, because the names are what appear in the boot menu.
Step 3: Boot from the pendrive
- Restart the PC and tap the boot menu key as it starts — usually F12, F11, F9 or Esc, depending on the brand.
- Select the pendrive from the list.
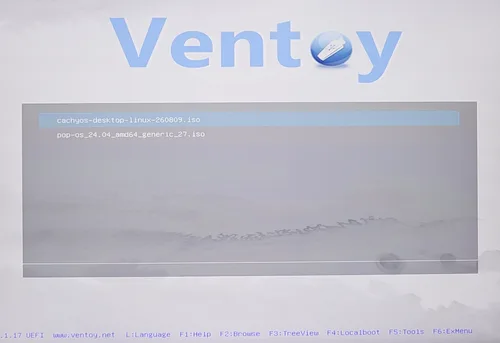
- The Ventoy menu appears, listing every ISO on the drive. Pick one.
- If Ventoy asks how to boot, choose Boot in normal mode. Only try grub2 mode if normal mode fails.
Secure Boot
On many modern PCs, Secure Boot blocks Ventoy the first time. You have two options:
- Enroll Ventoy’s key — when the security violation screen appears, follow the prompts to enroll the key once. Ventoy then boots normally from that point on.
- Disable Secure Boot in the BIOS/UEFI setup. This is usually the quicker route, and some distributions (including CachyOS and Pop!_OS) expect it anyway.
Troubleshooting: “I can’t copy my ISO to the drive”
This one caught me out, and it is the most common Ventoy mistake. If you cannot copy a large ISO onto the pendrive, check these in order.
| Symptom | Cause | Fix |
|---|---|---|
| Drive is read-only, nothing can be copied | A Ventoy .iso was flashed with Rufus, Etcher or dd, so the drive holds a read-only CD image | Do not flash Ventoy. Run Ventoy2Disk (or Ventoy2Disk.sh) on the drive instead |
| Files under 4 GB copy, larger ones fail | The partition is FAT32, which cannot hold a file bigger than 4 GB | Reformat the large Ventoy partition as exFAT or NTFS. Leave VTOYEFI untouched |
| Drive will not mount on Linux | Missing exFAT support | Install exfatprogs, or use kernel 5.7 or newer |
| Copy fails partway through | Drive full, or a fake-capacity drive | Check free space; test the drive with f3 or H2testw |
By default, Ventoy formats the main partition as exFAT, which has no 4 GB limit. On Linux you can confirm what you have with:
lsblk -o NAME,SIZE,FSTYPE,LABEL,MOUNTPOINTA healthy Ventoy drive shows two partitions: exfat labelled Ventoy, and a small vfat labelled VTOYEFI. If you see iso9660 instead, the ISO was flashed and you need to reinstall Ventoy properly.
Useful extras
- Updating Ventoy — run Ventoy2Disk again and click Update. It upgrades the bootloader and keeps your ISO files.
- Persistence — live Linux sessions can keep their changes between reboots using Ventoy’s persistence plugin.
- Themes and menu order — configurable through
ventoy.jsonin aventoyfolder on the drive. - iVentoy — from the same developer, it boots those same ISOs over the network with no USB drive at all.
Ventoy vs the other tools
| Tool | Best for | Trade-off |
|---|---|---|
| Ventoy | Many ISOs on one drive, added by copy and paste | Secure Boot needs a one-time step |
| Rufus | A single Windows installer, with options to skip the TPM and Microsoft account requirements | One ISO per drive, wipes it every time |
| balenaEtcher | Beginners flashing one Linux or Raspberry Pi image | One image only |
| Easy2Boot | Power users with large, customised boot menus | Much steeper learning curve |
| YUMI exFAT | A wizard that picks distributions for you | Built on Ventoy anyway |
One point worth knowing: in 2024 some users criticised Ventoy for shipping prebuilt binary files in its source repository that are hard to verify. There is no evidence of anything malicious, and I still use it happily — but if you are installing on sensitive machines, Rufus with a single verified ISO is the more conservative choice.
Wrapping up
One install, then copy and paste. That is the whole workflow. I keep CachyOS, Pop!_OS, a Windows installer and a rescue tool on a single 64 GB pendrive, and I have not flashed a USB drive since.
Which ISOs would you keep on yours? Let me know in the comments.