I am going to share on how I DIY a small LED lamp for my Marimo aquarium. It is basically a very small lamp, using 6 x white LED, USB powered, not a superbright lamp, but its bright enough for my Marimo tank.
The finished DIY LED Lamp on my Marimo tank:
Components needed for the lamp
- USB mini port/receptable, that will be use as the power port for the lamp.
- 6 x LEDs, SMD 60mA warm white LED, (bought from here), actually any LED will do, as long as the correct resistor value is applied.
- 3 x 30 Ohm resistor (I am using SMD resistor to reduce the size of the lamp, any resistor will do) to limit the current on the LED.
- Optional Electrolytic capacitor (I figured out that the cap will take a lot of space, so, I remove it from my lamp in the middle of making it)
- This projects also needs some Polymorph plastic for the lamp body (I get it from here).
The 1st step is to solder all the components together. The circuitry is very straight forward, the LED will be directly powered by the 5V from USB port, with some resistor to limit the current.
Soldering wire to USB mini port
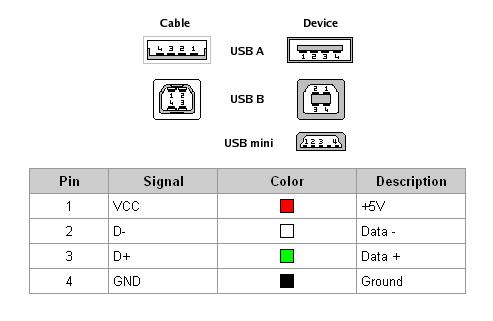
The pinout for a USB port:
Take note that I connect both D+ and D- on the USB mini port to disable data mode when this port is connected to PC. In some PC/laptop connecting D+ and D- also allows the port to output higher current on that USB port.
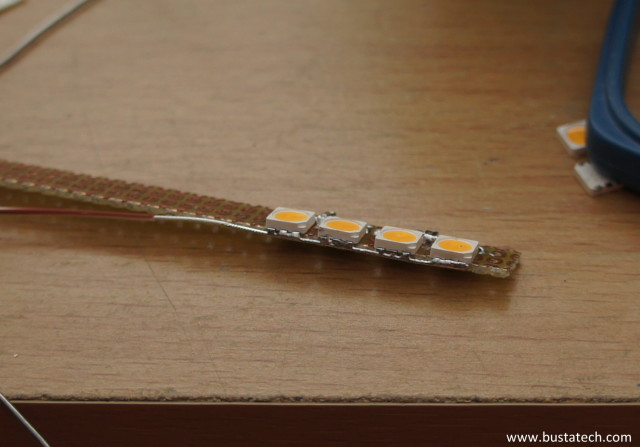
Connect LEDs and resistor on a small donut board
To connect the LEDs and resistor together, there are quite some method. I am using a very small size donut board, and arrange 6 x LEDs onto the board. You can use your creativity to connect all the LEDs together.
Take note that I am using 1 x 30 ohm resistor for 2 x LEDs. The forward voltage for the LED is around 3.5V, USB supply is 5V, so, I am actually supplying (5-3.5)/30 = 50mA to 2 x LEDs. According the datasheet of the LED, the max current for each LED is 60mA, but to increase the lifetime of the LEDs and to reduce the generated heat from the LEDs, I am supplying 25mA to each LED. And from the test result, the brightness is good enough for my usage.
All 6 x LEDs will be connected in parallel and there will be a pair +ve and -ve terminal for these LEDs.
Connect LEDs board to the USB mini port
So, there is no ON/OFF switch on the whole system. Connect the USB, and the LEDs will be turned ON.
Testing the LEDs:
Making the body of the lamp using Polymorph
The polymorph I am using:
Melting the Polymorph in boiling water (its melting temperature is around 60 degree):
I start by making the “head” of the LED lamp. I wrap the USB mini port using melted polymorph and try to shape it into something like a paper clip, that can be use to make the lamp clippable onto the Marimo tank.
Do make sure that the polymorph do not cover the USB mini port “entrance”.
The whole finished LED lamp. I didn’t capture much photo in the progress of making this, as I need to be quick in shaping the polymorph or else it will be harden in the room temperature.
This is the result of a lot try and error, especially if you are very new to polymorph. One good thing about polymorph is that you can always fix the shape by re-melt it using either boiling water, or a torch lighters (be careful not to overheat the polymorph). I cover the whole LED board using polymorph. Do not worry about the polymorph blocking the lighting from the LED. Polymorph itself is white in color with some level of transparency, and the way that the lights comes through the polymorph actually result in soft and nice lighting. Covering the whole thing also make it water proof (it is also possible to put the covered part into the water for in water lighting decoration.
Finished LED lamp mounted on my Marimo tank.
Result
I am quite satisfy with the result, really gives my Marimo tank very nice lighting. Please feel free to comment, or to share on whatever thoughts over this project.


I’m really impressed… especially of using the polymorph material. n1!